How to Screenshot on Windows: Every Shortcut Explained
Windows has at least five built-in ways of taking screenshots, and most people only ever use one. That works until you need to capture a menu that closes the moment you press a key, grab one window without the clutter around it, or find the image you took a minute ago.
This guide covers every screenshot method that ships with Windows 10 and Windows 11: which keys do what, how the Snipping Tool, Snip & Sketch and the Game Bar fit in, where your screenshot is saved, and what you can do when PrtScn seems to do nothing. You can use all of these without installing anything, and you can switch between them freely, because they all end up as the same PNG image.
The fastest way: Windows + Shift + S
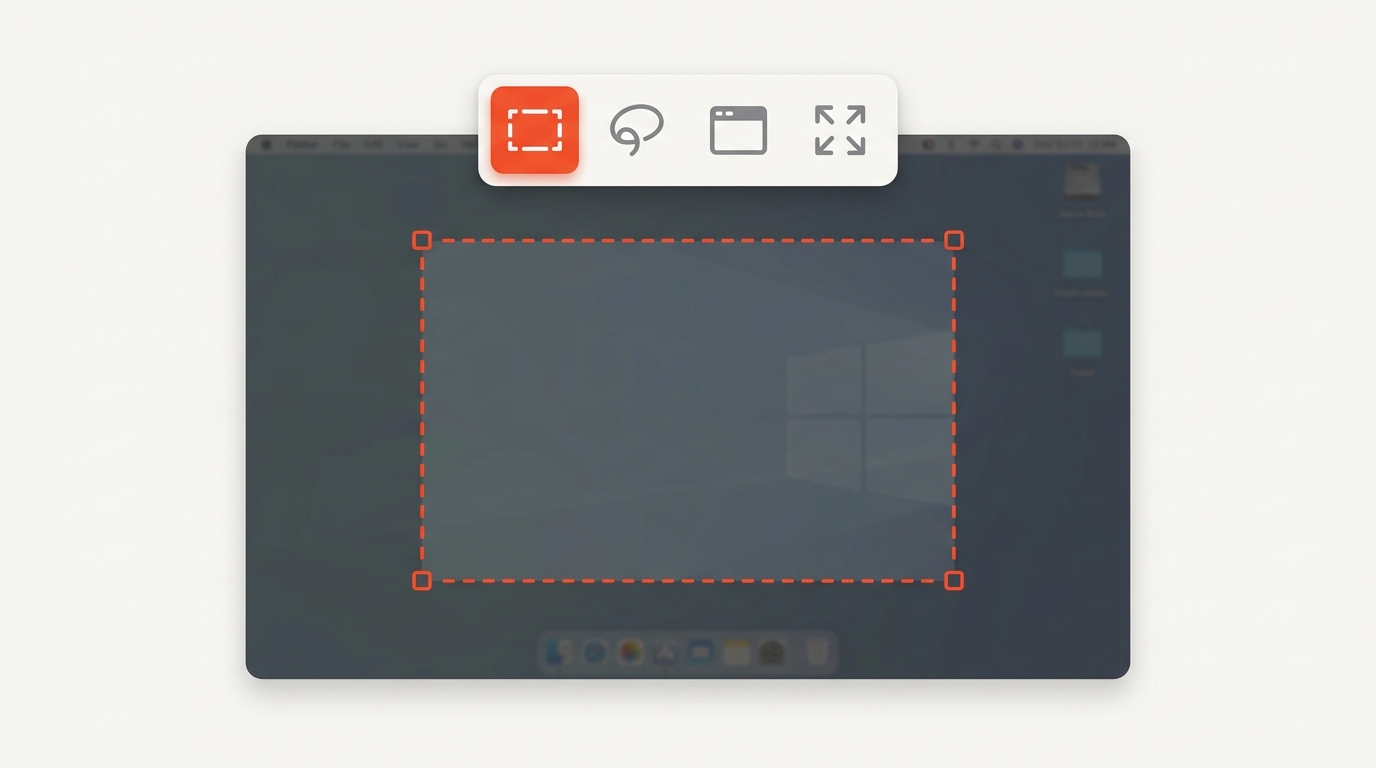
Press the Windows key + Shift + S and your screen dims. A small toolbar appears at the top with four capture modes: rectangle, freeform, window and full screen. Drag over the part of your screen you want, or click a window, and the snip is copied to your clipboard. A notification pops up in the corner; click it and the capture opens for editing, where you can crop it, draw on it and save your screenshot as a file.
On Windows 11 the image is also saved automatically to the Screenshots folder inside Pictures, so you can skip the notification if you just want the file. On Windows 10 the snip stays on the clipboard until you paste it with Ctrl + V or click the notification and save it.
This is the shortcut to learn first. Using it covers the three things people need most, a partial capture, a single window and the entire screen, and it works on every keyboard, including laptops without a dedicated Print Screen key. If you are used to taking screenshots with the Print Screen key, this feels like the same thing with a selection step added.
Print Screen and its three variants
The Print Screen key, labeled PrtScn or Prt Sc on most keyboards, is the classic way of taking screenshots on Windows and still works on every version. It comes in three flavors:
| Keys | What it captures | Where it goes |
|---|---|---|
| PrtScn | the entire screen | clipboard only |
| Alt + PrtScn | the active window | clipboard only |
| Windows key + PrtScn | the entire screen | saved automatically as a PNG image in Pictures, Screenshots |
Clipboard only means nothing is saved yet. Paste the image into Paint, Word, an email or a chat with Ctrl + V, then save it from there. If you want a file without pasting anything, press the Windows key and PrtScn together: the screen flashes for a moment and the image lands in your Pictures, Screenshots folder, numbered automatically.
On many laptops the Print Screen key shares space with another function. If pressing it does nothing, hold the Fn key as well.
Using the Snipping Tool, step by step
The Snipping Tool is the app behind the Windows + Shift + S shortcut, and opening it directly gives you a few features the shortcut hides. Here is how you can use it:
- Open the Start menu, type Snipping Tool and press Enter. You can also pin the app to the taskbar if you take screenshots often.
- Choose a mode from the toolbar: rectangle, window, full screen or freeform snip.
- Set a delay of 3, 5 or 10 seconds if you need to open a menu, a tooltip or a hover state before capturing.
- Click the New button. The screen dims; drag or click to capture.
- The snip opens in the editor. Use the pen, highlighter, ruler and crop features for editing, then click the save button or press Ctrl + S.
On Windows 11 the app can also record a video of your screen, extract text from a snip with one click, and blur or redact parts of the image, which is handy for hiding an email address before you share a support screenshot. Microsoft documents every feature on its Snipping Tool support page.
Snip & Sketch on Windows 10
On Windows 10 the same job is split between two apps, the classic Snipping Tool and Snip & Sketch. Snip & Sketch is what opens when you use the keyboard shortcut, and it offers the same four modes, a delay and a simple editor with pen, pencil, highlighter and a ruler. If you like Snip & Sketch, you can set it to open with the Print Screen key, as described further down. Both apps still work, and both save to the same Pictures, Screenshots folder, so there is no wrong choice; Snip & Sketch is the more modern of the two and the one Microsoft kept developing into the Windows 11 app.
Game Bar: screenshots in full-screen games and apps
Some full-screen games and video apps block the usual shortcuts and return a black image. The Xbox Game Bar does not care.
- Press the Windows key + G to open the Game Bar overlay.
- In the Capture widget, click the camera button to take a screenshot, or press Windows key + Alt + PrtScn without opening the overlay at all.
- The image is saved automatically to Videos, Captures.
The Game Bar works in most apps, not only games, which makes it a useful fallback when a program refuses to be captured by the Snipping Tool. The same widget can record video of the app, with or without the microphone, and the clips land in the same Captures folder.
Paint, Word and the clipboard
Any screenshot that lands on the clipboard can be pasted into Paint with Ctrl + V. Paint is also the quickest way to crop a snip, add an arrow or save the image as JPG instead of PNG. Open Paint, paste, click Select or Crop, then Save as. The same paste works in Word, PowerPoint, Outlook, Teams and most chat apps, which is often all you need: capture, paste, send, no file involved. If you prefer to keep a copy, save it from Paint into your Screenshots folder like everything else.
Make the Print Screen key open the capture toolbar
If you would rather press one key than three, Windows can remap the Print Screen key:
- Open Settings, then Accessibility, then Keyboard.
- Turn on Use the Print Screen key to open screen capture.
From then on pressing the key once opens the same capture toolbar as Windows + Shift + S. On recent Windows 11 builds this is already the default, which is why the key suddenly opens the Snipping Tool on a new PC instead of copying the screen silently. Turn the feature off if you want the old behavior back.
Where do Windows screenshots go?
Where your screenshot ends up depends on how you took it:
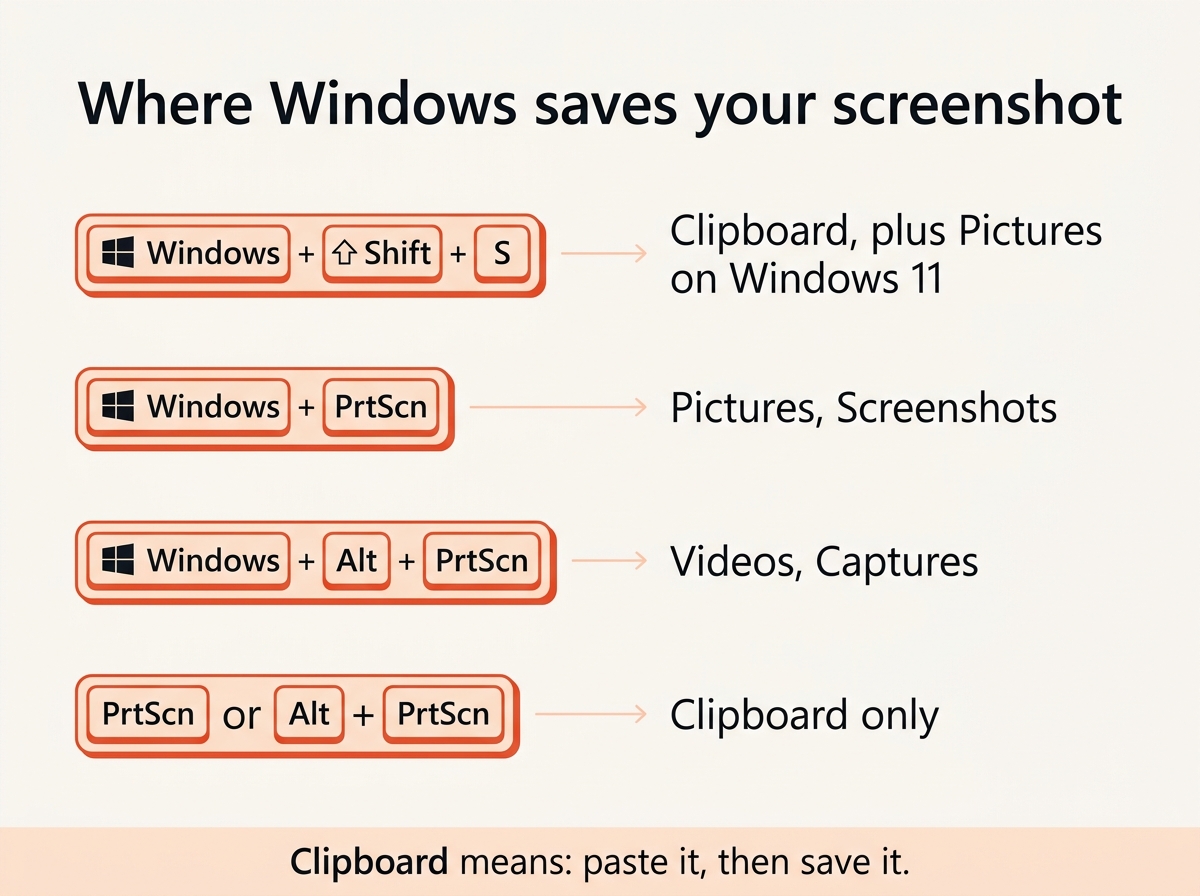
- Windows + Shift + S and the Snipping Tool: the clipboard, plus the Pictures, Screenshots folder on Windows 11.
- Windows key + PrtScn: the Pictures, Screenshots folder, as PNG files named Screenshot (1), Screenshot (2) and so on.
- Game Bar: Videos, Captures.
- PrtScn and Alt + PrtScn: the clipboard only. Nothing is saved until you paste the image somewhere and save it.
To change the folder, open File Explorer, right-click Screenshots, choose Properties and use the Location tab to move it, for example into OneDrive so every screenshot syncs to your other devices. All your future screenshots will land there automatically.
Screenshot of a single window
Three ways, from quickest to most precise:
- Alt + PrtScn copies the active window to the clipboard, including its title bar and borders.
- Windows + Shift + S, then the window mode: hover over any window on your screen, even one behind another, and click to capture it.
- The Snipping Tool with a delay: open the app, set 5 seconds, click New, then open the menu inside the window you want captured.
If you want the window without the drop shadow Windows draws around it, crop the result afterwards. Our image cropper does that in your browser without uploading the file.
Screenshot of part of the screen
For a specific area, Windows + Shift + S with the rectangle mode is the fastest. Drag from one corner to the other and release. If the selection is not quite right, click the notification and crop the capture in the editor instead of taking it again. Freeform mode lets you draw an outline by hand, which is useful for capturing an irregular shape on an image you plan to annotate. Both modes are also available as features in the Snipping Tool itself, where you can combine them with the delay.
Scrolling screenshots on Windows
Windows still cannot capture a whole web page or a long document in one image. For web pages, your browser does it: Firefox offers a full-page capture in the right-click menu, and Chrome and Edge hide one in the developer tools. The scrolling screenshot guide walks through both, plus the third-party tools for everything outside the browser.
Editing a screenshot without extra software
Everything you need for a quick edit is already on your PC:
- Snipping Tool editor: pen, highlighter, ruler, crop, and on Windows 11 text extraction and redaction.
- Snip & Sketch: the same editing features on Windows 10.
- Paint: crop, resize, arrows, text and saving as JPG.
- Photos app: crop, rotate, light adjustments and a markup pen.
For a smaller file to email or upload, run the image through the image compressor or convert the PNG to JPG. For a file that must stay under a specific size, the compress to size tool finds the right quality automatically.
Troubleshooting: Print Screen does not work
- The key needs Fn. On compact laptop keyboards, press Fn + PrtScn.
- Nothing visible happens. That is normal for PrtScn and Alt + PrtScn; the image is on the clipboard. Paste it somewhere.
- A different app grabbed the key. OneDrive, Dropbox and some screenshot tools take over the Print Screen key. Check their settings or close them.
- Windows 11 opens the Snipping Tool instead. That is the remap described above. Turn it off in Settings, Accessibility, Keyboard if you prefer the old behavior.
- A black image in a game or video app. Use the Game Bar keys, Windows + Alt + PrtScn, instead.
- The clipboard is empty after pasting. Clipboard history may be off. Press Windows + V and turn it on; Windows then keeps the last 25 items, including every snip you take.
- The Snipping Tool will not open. Restart it from the Start menu, or reset the app under Settings, Apps, Installed apps.
All Windows screenshot keys at a glance
| Keys | Result |
|---|---|
| Windows + Shift + S | capture toolbar: rectangle, freeform, window, full screen |
| PrtScn | entire screen to clipboard |
| Alt + PrtScn | active window to clipboard |
| Windows + PrtScn | entire screen saved to Pictures, Screenshots |
| Windows + Alt + PrtScn | Game Bar screenshot saved to Videos, Captures |
| Windows + G | open the Game Bar |
| Ctrl + V | paste the image |
| Windows + V | clipboard history |
Frequently asked questions
How do I take a screenshot on Windows without Print Screen?
Press Windows + Shift + S. It works on every keyboard and gives you the four capture modes, or open the Snipping Tool from the Start menu and click New.
What format are Windows screenshots?
PNG, which keeps text and interface elements sharp. Paste into Paint and save as JPG if you need a smaller file, or use the image compressor.
How do I take a screenshot with a delay?
Open the Snipping Tool, set the delay to 3, 5 or 10 seconds, then click New. Use the time to open the menu or hover state you want to capture.
How do I screenshot the entire screen on a laptop?
Windows key + PrtScn saves the entire screen as a file. Windows + Shift + S followed by the full screen mode copies it to the clipboard. Hold Fn if your Print Screen key is a shared function key.
Can I annotate a screenshot without extra software?
Yes. Click the notification after a capture to open the editor, which has a pen, highlighter, crop tool and, on Windows 11, text extraction and blur.
How do I take a screenshot on Windows 7 or 8?
PrtScn, Alt + PrtScn and the classic Snipping Tool all exist there too. Windows + PrtScn arrived with Windows 8, and the Windows + Shift + S capture toolbar with Windows 10.
Where is the Snipping Tool on Windows 11?
In the Start menu: type Snipping Tool and press Enter. If you cannot find it, reinstall the app from the Microsoft Store.
The short version
Learn one shortcut: Windows + Shift + S. Use Windows + PrtScn when you want a file without clicking anything, the Snipping Tool when you need a delay or editing, and the Game Bar when a full-screen app blocks everything else. For the keys on Mac, iPhone and Android, see the screenshot guide for every device.